¶ 人脸识别
¶ 人脸检测的原理
人脸检测的原理是基于计算机视觉和机器学习技术来自动定位和识别图像中的人脸。其基本原理可以概括为以下几个步骤:
- 图像预处理:首先对输入的图像进行预处理,例如灰度化、直方图均衡化等,以提高图像质量,减少光照、角度等因素对检测的影响。
- 特征提取:利用各种算法从预处理后的图像中提取人脸的特征。这些特征可以是基于像素强度的,也可以是基于更高级别的抽象特征,例如边缘、角点、纹理等。在这个阶段,常用的特征提取方法有Haar特征、LBP特征、HOG特征等。
- 候选框处理:在图像中生成一系列可能包含人脸的候选框,这些候选框通常是通过滑动窗口或区域提议网络等方法生成的。
- 分类器:采用机器学习算法训练分类器,例如支持向量机(SVM)、Adaboost等,用于判断每个候选框是否为人脸。分类器基于提取的特征进行决策,确定图像中的哪些区域为人脸。
随着深度学习的发展,卷积神经网络(CNN)已经成为人脸检测的主流方法。基于深度学习的人脸检测方法,如MTCNN、Single Shot MultiBox Detector (SSD) 和 YOLO 等,可以端到端地训练人脸检测模型,取得了很好的效果。
这里我们主要使用Haar特征。
Haar特征是一种用于图像识别,特别是人脸识别的特征描述器。它基于图像灰度值的差异,通过计算图像中特定区域的像素和来描述图像特征。
Haar特征可以理解为卷积模板,分为三类:边缘特征、线性特征、中心特征和对角线特征,组合成特征模板。
这些模板内有白色和黑色两种矩形,并定义该模板的特征值为白色矩形像素和减去黑色矩形像素和。
这个特征值反映了图像的灰度变化情况。
例如,脸部的一些特征能由矩形特征简单地描述,如眼睛要比脸颊颜色深,鼻梁两侧比鼻梁颜色深,嘴巴比周围颜色深等。
¶ 基于opencv的人脸检测与特征点提取
这里我们使用opencv+第三方人脸识别库dlib来完成人脸检测的工作。
import cv2
import dlib

#加载人脸识别器分类器
detector = dlib.get_frontal_face_detector()

#加载人脸特征点提取模型
landmark_predictor = dlib.shape_predictor('shape_predictor_68_face_landmarks.dat')

#导入图片
img = cv2.imread('face.jpeg')
# 获取图片人脸子描述
faces = detector(img,1)
if (len(faces) > 0):#当检测人脸大于0时
    for k,d in enumerate(faces):
        cv2.rectangle(img,(d.left(),d.top()),(d.right(),d.bottom()),(255,255,255))
        shape = landmark_predictor(img,d)
        for i in range(68):
            cv2.circle(img, (shape.part(i).x, shape.part(i).y),5,(0,255,0), -1, 8)
            cv2.putText(img,str(i),(shape.part(i).x,shape.part(i).y),cv2.FONT_HERSHEY_SIMPLEX,0.5,(255,2555,255))
cv2.imshow('Frame',img)#窗口显示
cv2.waitKey(0)
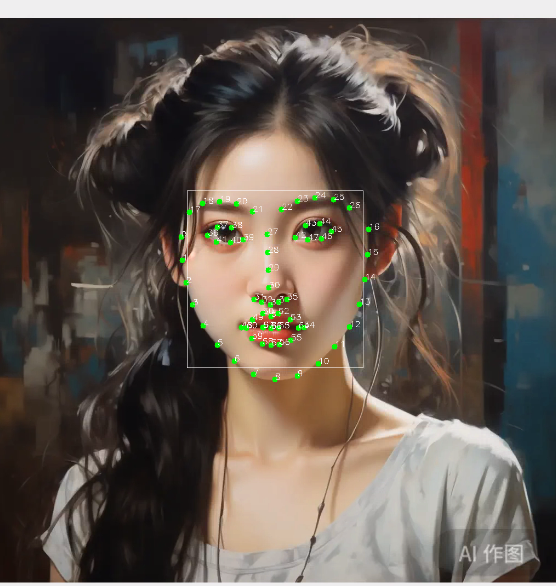
运行结果:
¶ 人脸信息保存
为了满足人脸识别的需求,我们首先需要保存人脸的图像。
打开机器人摄像头,弹出 test 窗口检测到人脸系统会框出来,按 a 键然后拍照,系统会自动描出人脸的子描述并有 frame 弹窗显示出来。
import numpy as np
import cv2
import sys
import dlib

cv2.namedWindow("test")
#1调用摄像头
cap=cv2.VideoCapture(0)
#2人脸识别器分类器
classfier=cv2.CascadeClassifier("haarcascade_frontalface_default.xml")
sp = dlib.shape_predictor('shape_predictor_68_face_landmarks.dat')#加载检测器
color=(0,255,0)
while cap.isOpened():#当摄像头打开时
    ok,frame=cap.read()
    if not ok:
        break
    #3灰度转换
    grey=cv2.cvtColor(frame,cv2.COLOR_BGR2GRAY)
    #4人脸检测,图片缩放比例和需要检测的有效点数
    faceRects = classfier.detectMultiScale(grey, scaleFactor = 1.2, minNeighbors = 3, minSize = (32, 32))
    if len(faceRects) > 0:            #大于0则检测到人脸
        print("检测到人脸")
        for faceRect in faceRects:  #单独框出每一张人脸
             x, y, w, h = faceRect  #5画图
             cv2.rectangle(frame, (x - 10, y - 10), (x + w + 10, y + h + 10), color, 3)
    cv2.imshow("test",frame)#显示窗口
    print("检测中。。。。。。")
    if cv2.waitKey(10)&0xFF==ord('a'):#输入a退出保存图片
        cv2.imwrite("tests.jpg", frame)#保存图片
        detector = dlib.get_frontal_face_detector()#调用检测器
        img = cv2.imread('tests.jpg')
        faces = detector(img,1)
        if (len(faces) > 0):#大于0则检测到人脸
            for k,d in enumerate(faces):
                cv2.rectangle(img,(d.left(),d.top()),(d.right(),d.bottom()),(255,255,255))
                shape = sp(img,d)
                for i in range(68):
                    cv2.circle(img, (shape.part(i).x, shape.part(i).y),5,(0,255,0), -1, 8)
                    cv2.putText(img,str(i),(shape.part(i).x,shape.part(i).y),cv2.FONT_HERSHEY_SIMPLEX,0.5,(255,2555,255))
        cv2.imshow('Frame',img)#显示窗口
        cv2.waitKey(0)

cap.release()
cv2.destroyAllWindows()#关闭窗口
¶ 相似度对比,人脸识别
然后我们使用神经网络来对比两个人脸图片的相似度来确认人脸识别,大于一定阈值的则识别成功。
人脸识别使用dlib_face_recognition_resnet_model_v1.dat。
dlib_face_recognition_resnet_model_v1.dat是一个预训练的ResNet人脸识别模型。它是使用dlib库进行人脸识别的关键部分。
这个模型文件包含了在大量人脸图像上训练得到的参数,使其能够进行人脸特征的提取和识别。
在使用这个模型时,通常需要进行人脸检测、关键点提取、描述子生成等步骤,然后利用生成的描述子进行人脸匹配和识别。
它能够根据输入的人脸图像,输出相应的人脸特征向量,进而实现人脸识别的功能。
import numpy as np
import cv2
import sys
import dlib
import numpy
from skimage import io

def facedetec():
    cv2.namedWindow("test")
    #1调用摄像头
    cap=cv2.VideoCapture(0)

    #2人脸识别器分类器
    classfier=cv2.CascadeClassifier("haarcascade_frontalface_default.xml")

    color=(0,255,0)

    facerec = dlib.face_recognition_model_v1("dlib_face_recognition_resnet_model_v1.dat")

    sp = dlib.shape_predictor('shape_predictor_68_face_landmarks.dat')#加载检测器

    detector = dlib.get_frontal_face_detector()

    while cap.isOpened():
        ok,frame=cap.read()
        if not ok:
            break
        #3灰度转换
        grey=cv2.cvtColor(frame,cv2.COLOR_BGR2GRAY)

        #4人脸检测,1.2和2分别为图片缩放比例和需要检测的有效点数
        faceRects = classfier.detectMultiScale(grey, scaleFactor = 1.2, minNeighbors = 3, minSize = (32, 32))
        if len(faceRects) > 0:            #大于0则检测到人脸
            print("检测到人脸")
            for faceRect in faceRects:  #单独框出每一张人脸
                 x, y, w, h = faceRect  #5画图
                 cv2.rectangle(frame, (x - 10, y - 10), (x + w + 10, y + h + 10), color, 3)#单独框出每一张人脸

        cv2.imshow("test",frame)#窗口显示

        if cv2.waitKey(10)&0xFF==ord('a'):#输入a截取图片并检测
            cv2.imwrite("test.jpg", frame)#保存获取图片
            img = io.imread('frist.jpg')#加载检测的图片
            print("ok")

            detss = detector(img,1)# 图片人脸子描述

            if (len(detss) > 0):#大于0则检测到人脸
                print("ok1")
                for k,d in enumerate(detss):
                    shape = sp(img,d)
                    face_descriptor = facerec.compute_face_descriptor(img, shape)
                    v = numpy.array(face_descriptor) #本地图片子描述存进v
                    print("ok2")
                img = io.imread("test.jpg")

                dets = detector(img, 1)# 获取图片人脸子描述

                for k, d in enumerate(dets):
                    shape = sp(img, d)
                    face_descriptor = facerec.compute_face_descriptor(img, shape)
                    d_test = numpy.array(face_descriptor) #boy.jpg子描述存进d_test
                    print("ok3")

                # 计算欧式距离,算出人脸之间的差距
                dist = numpy.linalg.norm(v-d_test)
                dist=(1-dist)*100
                print("相似度:",dist,"%")

                if(dist > 80):
                    print("ok4")

            cv2.waitKey(0)
    cap.release()
    cv2.destroyAllWindows()#关闭窗口
facedetec()
这样我们就完成了人脸的比对。